The Best Sock It To Me Cake Recipe – Moist, Buttery & Easy to Make
There is something truly magical about the scent of a fresh dessert wafting through your home. It brings back memories of family gatherings and quiet afternoons spent in the kitchen. You deserve a treat that feels like a warm hug on a plate.
Finding the best sock it to me cake recipe can transform your baking routine. This classic American staple is beloved for its incredible texture and rich, buttery flavor profile. It is the perfect centerpiece for any celebration or a simple weekend indulgence.

You might think professional results require hours of labor, but this easy sock it to me cake proves otherwise. By using simple techniques, you can achieve a moist crumb that impresses every guest. Mastering this delightful sock it to me cake recipe is easier than you ever imagined.
Key Takeaways
- Discover the secret to achieving a perfectly moist and buttery crumb every time.
- Learn how simple, high-quality ingredients elevate your home baking results.
- Understand the history behind this iconic American dessert favorite.
- Follow straightforward steps to ensure professional-quality results in your own kitchen.
- Gain confidence in your baking skills with this reliable and delicious guide.
Understanding the Southern Sock It To Me Cake
Baking a traditional Southern Sock It To Me cake is more than just following a recipe; it is an experience in culinary history. This dessert has graced tables across the United States for generations, serving as a centerpiece for family gatherings and community potlucks.
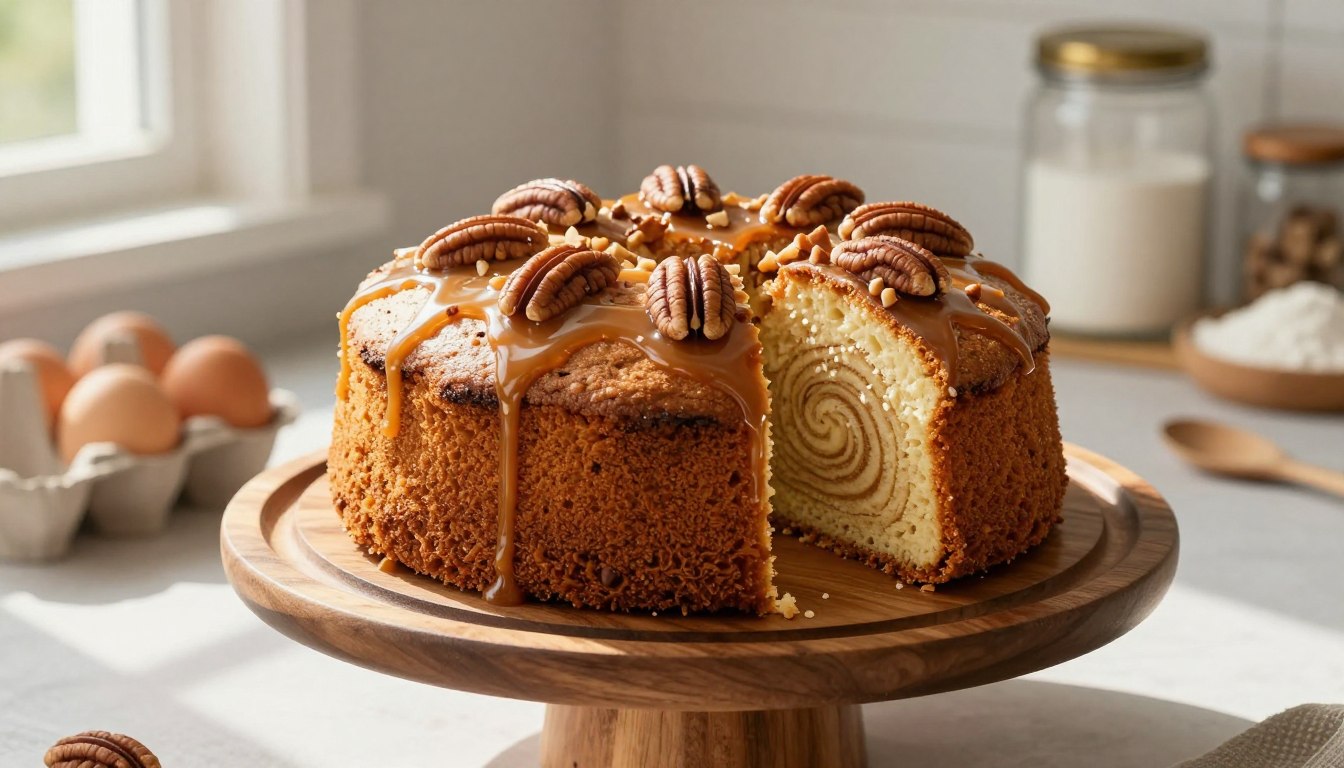
Its enduring popularity stems from the delightful contrast between the dense, rich batter and the hidden ribbon of cinnamon and nuts. You will find that this combination creates a sensory experience that is both comforting and sophisticated.
The History and Appeal of This Classic Bundt Cake
The charm of this classic Bundt cake lies in its simplicity and the surprise found in every slice. While many modern desserts rely on complex decorations, this cake relies on the quality of its ingredients and the perfect execution of the swirl.
When you prepare a reliable sock it to me cake recipe, you are participating in a long-standing tradition of Southern hospitality. The cake is designed to be shared, making it the perfect choice for those who love to host friends and family.
Why This Recipe Delivers a Moist and Buttery Crumb
Achieving the perfect texture requires an understanding of how specific ingredients interact during the baking process. The secret to a moist crumb lies in the balance of fats and leavening agents, which work together to create a tender structure.
By using high-quality butter and sour cream, you ensure that the cake remains soft for days after baking. The following table highlights the essential components that contribute to the success of your bake:
| Component | Primary Function | Resulting Texture |
|---|---|---|
| Butter | Aeration and Flavor | Rich and Buttery |
| Sour Cream | Moisture and Acidity | Tender and Soft |
| Cinnamon Filling | Flavor Contrast | Spiced and Textured |
| Eggs | Structure and Binding | Stable and Moist |
This sock it to me cake recipe is carefully balanced to ensure that the batter is sturdy enough to hold the cinnamon-pecan filling without sinking. You will appreciate how the science of baking transforms these simple pantry staples into a masterpiece of flavor.
Essential Ingredients for Your Homemade Bundt Cake
Your journey toward the best sock it to me cake recipe begins with selecting premium ingredients. While the technique is vital, the foundation of your dessert relies on the quality of the items you pull from your pantry. Using fresh, high-quality components ensures that every slice delivers the flavor and texture you expect.
Selecting the Right Flour and Leavening Agents
For a consistent crumb, stick to standard all-purpose flour. Avoid using cake flour or bread flour, as these can alter the structure of your homemade bundt cake significantly. You want a balance that is sturdy enough to hold the cinnamon swirl but tender enough to melt in your mouth.
Always check the expiration date on your baking powder. Leavening agents lose their potency over time, which can lead to a flat or dense cake. Fresh leavening is the secret to achieving that perfect, airy lift during the baking process.
The Importance of Room Temperature Dairy
Temperature plays a massive role in how your batter emulsifies. You must ensure your butter, eggs, and sour cream are at room temperature before you begin mixing. Cold ingredients do not bond well, which often results in a broken or greasy batter.
When these items are at room temperature, they create a stable emulsion that traps air effectively. This process is essential for creating the light, buttery crumb that defines this classic dessert. Plan ahead by setting your dairy out at least an hour before you start baking.
Choosing Quality Pecans and Cinnamon for the Filling
The signature swirl of this cake relies on the intensity of your filling. Invest in fresh, raw pecans rather than pre-toasted versions to avoid a bitter aftertaste. You can lightly toast them yourself to unlock their natural, nutty oils before adding them to the cinnamon mixture.
High-quality cinnamon is equally important for a bold, aromatic profile. Freshly ground cinnamon provides a much stronger punch than older spices that have been sitting in your cupboard for months. Use the following table to ensure you have the right components ready for your next baking session.
| Ingredient | Purpose | Key Tip |
|---|---|---|
| All-Purpose Flour | Structure | Sift for lightness |
| Room Temp Butter | Aeration | Softened, not melted |
| Fresh Pecans | Texture | Toast for depth |
| Ground Cinnamon | Flavor | Use fresh spice |
Preparing Your Kitchen and Equipment
Achieving a flawless release for your homemade bundt cake starts long before you mix the batter. Proper preparation ensures that your hard work results in a beautiful, intact dessert rather than a crumbled mess. By organizing your workspace and selecting the right tools, you set the stage for a professional-quality bake.
Choosing the Perfect Bundt Pan
The foundation of any great homemade bundt cake is the pan itself. You should look for a heavy-duty, light-colored metal pan, as these provide the most consistent heat distribution. Darker pans tend to absorb heat too quickly, which can lead to burnt edges before the center is fully cooked.
Size also matters significantly for your final result. A standard 10-to-12 cup pan is ideal for most recipes, ensuring the batter has enough room to rise without overflowing. Always check the manufacturer’s capacity to avoid spills in your oven.
| Pan Material | Heat Conductivity | Best Use |
|---|---|---|
| Cast Aluminum | Excellent | Even browning and detail |
| Non-stick Steel | Good | Easy release for beginners |
| Silicone | Low | Quick cooling and flexibility |
Proper Greasing and Flour Techniques for Easy Release
Even the most expensive pan requires careful preparation to guarantee a clean release. Start by using a high-quality baking spray that contains flour, or brush the interior with a thin layer of melted butter. Be sure to reach into every single crevice of the pan’s design, as these intricate patterns are where cakes are most likely to stick.
After greasing, lightly dust the pan with flour and tap out the excess. This creates a physical barrier between the batter and the metal, ensuring your homemade bundt cake slides out effortlessly once cooled. Taking these extra few minutes to prepare your equipment is the secret to a stunning presentation every time.
Step-by-Step Guide to Mixing the Batter
Mastering the art of mixing is essential for a high-quality, buttery bundt cake. By following a structured approach, you ensure that every slice offers the perfect crumb and flavor profile. Precision during these initial stages prevents common baking pitfalls and guarantees a professional result in your own kitchen.

Creaming Butter and Sugar for Maximum Aeration
The foundation of your cake begins with the creaming process. You must beat the softened butter and sugar together until the mixture appears pale and fluffy. This step is crucial because it creates tiny air pockets that expand during baking, giving your buttery bundt cake its signature lift.
Incorporating Eggs and Sour Cream for Moisture
Once your butter and sugar are aerated, add your eggs one at a time. Ensure each egg is fully integrated before adding the next to maintain a stable emulsion. Adding sour cream at this stage introduces a rich, tangy moisture that keeps the crumb tender and prevents the cake from drying out.
Combining Dry and Wet Ingredients Without Overmixing
When it is time to add your flour mixture, switch to a gentle hand or a low mixer speed. You should fold the dry ingredients into the wet base just until they disappear. Overmixing develops too much gluten, which can turn a light, airy dessert into a dense, tough loaf.
| Mixing Stage | Primary Goal | Key Benefit |
|---|---|---|
| Creaming | Aeration | Light, fluffy structure |
| Emulsifying | Moisture | Rich, tender crumb |
| Folding | Gluten Control | Soft, delicate texture |
By carefully managing these three phases, you protect the integrity of your buttery bundt cake. Patience during the mixing process is the secret ingredient that separates a standard cake from a truly memorable one.
Crafting the Signature Cinnamon Pecan Filling
A rich, spiced filling is what transforms a simple bundt cake into a Southern masterpiece. This aromatic layer provides the signature flavor profile that makes a cinnamon pecan cake so incredibly popular. By focusing on high-quality ingredients, you ensure that every bite delivers a perfect harmony of sweetness and spice.
Balancing the Cinnamon and Brown Sugar Ratio
To achieve the best results, you must find the right balance between your brown sugar and ground cinnamon. A standard ratio usually calls for one part cinnamon to four parts sugar, but you can adjust this based on your personal preference for warm, bold spices. Using dark brown sugar adds a deeper molasses note, which complements the buttery base of your dessert.
Ensure your pecans are finely chopped to allow for even distribution throughout the filling. When these ingredients combine, they create a sandy, fragrant mixture that melts beautifully during the baking process. This step is essential for maintaining the structural integrity of your cinnamon pecan cake while maximizing flavor.
Layering the Filling for the Perfect Swirl
Creating that beautiful, consistent swirl requires a bit of patience and precision. Start by pouring about one-third of your batter into the prepared bundt pan, smoothing it out with a spatula. Sprinkle a generous, even layer of your cinnamon-sugar mixture over the batter, making sure to keep it away from the very edges of the pan.
Repeat this process with the remaining batter and filling to build your layers. Using a butter knife, gently drag it through the batter in a swirling motion to marble the mixture without over-blending. This technique ensures that your cinnamon pecan cake features a stunning, professional-looking interior in every single slice you serve.
Baking Your Easy Sock It To Me Cake to Perfection
Mastering the baking process is the final hurdle in creating a professional-quality treat at home. When you prepare an easy sock it to me cake, the environment inside your oven plays a critical role in the final texture. Precision during this stage ensures that your dessert rises evenly and maintains that signature buttery crumb.

Managing Oven Temperatures for Even Baking
Consistency is the foundation of a successful bake. Always preheat your oven at least twenty minutes before sliding your pan inside to ensure the temperature is stable. Using an external oven thermometer is a smart habit, as many home ovens fluctuate from the set dial temperature.
Avoid opening the oven door frequently during the first thirty minutes of baking. Sudden temperature drops can cause the center of your cake to collapse, ruining the structure. If you notice your oven has hot spots, rotate the pan gently halfway through the baking time to promote uniform browning.
Testing for Doneness with the Toothpick Method
Determining when your cake is ready requires more than just a timer. The toothpick method remains the most reliable way to check the interior moisture levels. Insert a wooden skewer or toothpick into the thickest part of the cake, ideally near the center.
If the toothpick comes out with a few moist crumbs attached, your easy sock it to me cake is perfectly baked. A completely clean toothpick may indicate that the cake is slightly overdone and could become dry. If you see wet batter, give it another five minutes and test again.
Cooling and Inverting Your Cake Safely
Patience is essential once you remove the pan from the heat. Let the cake rest in the pan on a wire rack for exactly ten minutes. This short cooling period allows the structure to set, making it much easier to release from the mold without tearing.
To invert, place a cooling rack over the top of the pan and flip both items quickly but carefully. Lift the pan away slowly to reveal your beautiful, golden creation. If the cake feels stuck, tap the bottom of the pan gently to encourage a clean release.
| Baking Stage | Action Required | Goal |
|---|---|---|
| Preheating | Set to 350°F | Stable environment |
| Mid-Bake | Rotate pan | Even heat distribution |
| Testing | Use toothpick | Perfect moisture level |
| Cooling | Wait 10 minutes | Structural integrity |
Finishing Touches with a Vanilla Glazed Cake Topping
Nothing completes a moist Bundt cake quite like a smooth and glossy glaze. A vanilla glazed cake not only looks stunning on your serving platter but also adds a necessary layer of sweetness that balances the rich, buttery crumb. This final step is where your dessert truly transforms from a simple home-baked treat into a professional-looking masterpiece.
Mixing a Smooth and Glossy Vanilla Glaze
To achieve the perfect consistency, you must focus on the ratio of powdered sugar to liquid. Start by whisking together two cups of sifted powdered sugar with a small amount of heavy cream or whole milk. Consistency is key, so add your liquid one teaspoon at a time to ensure you do not make the mixture too thin.
If you prefer a thicker, more opaque finish, use less liquid. For a thinner, more translucent drizzle, add a tiny bit more milk. You can also incorporate a splash of pure vanilla extract to enhance the aromatic profile of your vanilla glazed cake.
Applying the Glaze for Professional Results
Timing is everything when it comes to applying your glaze. You should wait until the cake has cooled completely to room temperature before you begin. If the cake is still warm, the glaze will melt and soak into the crumb rather than sitting beautifully on top of the ridges.
Use a spoon or a small piping bag to drizzle the glaze slowly over the top of the Bundt cake. Allow the excess to drip down the sides naturally for that classic, elegant look. Once applied, let the glaze set for at least fifteen minutes before slicing your vanilla glazed cake to ensure clean, sharp edges.
| Glaze Type | Sugar Ratio | Liquid Amount | Best Use |
|---|---|---|---|
| Thick Drizzle | 2 Cups | 1.5 Tablespoons | Defined, opaque lines |
| Standard Glaze | 2 Cups | 2 Tablespoons | General coverage |
| Thin Glaze | 2 Cups | 3 Tablespoons | Light, glossy sheen |
Troubleshooting Common Baking Challenges
Even the most seasoned bakers occasionally face hurdles when preparing a classic Bundt cake. While the process is straightforward, minor variables in your kitchen environment can impact the final result. Understanding how to address these common issues ensures your dessert turns out perfectly every time.
Preventing the Cake from Sticking to the Pan
The most frequent frustration involves a cake that refuses to release from the pan. To avoid this, ensure you use a high-quality baking spray that contains flour, or manually brush the pan with melted butter and a light dusting of flour. Consistency is key when coating every crevice of the intricate Bundt design.
After removing the cake from the oven, allow it to rest in the pan for exactly ten minutes. If you invert it too early, the structure may collapse; if you wait too long, the sugars will harden and cause the cake to stick. Gently tapping the sides of the pan before flipping can also help loosen the edges.
Fixing a Dry or Dense Texture
A dry or dense crumb often results from over-measuring your flour or overmixing the batter. Always use the “spoon and level” method to measure flour rather than scooping directly with the measuring cup. Overmixing develops too much gluten, which leads to a tough, bread-like texture instead of a light, buttery crumb.
If your cake feels dense, check your oven temperature with an external thermometer. Ovens often run hotter or cooler than the dial indicates, which significantly affects the rise and moisture levels. Ensure your leavening agents, such as baking powder, are fresh and not expired to guarantee a proper lift.
Storing and Preserving Your Cake for Freshness
Proper storage is essential to maintain the moist texture of your cake for several days. Keep the cake in an airtight container at room temperature for up to three days to preserve its flavor. If your kitchen is particularly warm, you may store it in the refrigerator, but be sure to bring it back to room temperature before serving.
For longer storage, you can freeze the cake tightly wrapped in plastic wrap and aluminum foil. This method keeps the cake fresh for up to two months without compromising the quality of the glaze or the cinnamon filling. Always thaw the cake slowly in the refrigerator overnight to maintain its structural integrity.
| Issue | Primary Cause | Recommended Solution |
|---|---|---|
| Sticking to Pan | Inadequate greasing | Use flour-based spray and wait 10 minutes |
| Dry Texture | Over-measuring flour | Use spoon-and-level method |
| Dense Crumb | Overmixing batter | Mix only until ingredients combine |
| Stale Cake | Improper storage | Use airtight container at room temp |
Conclusion
Baking a perfect cake at home brings a sense of accomplishment that store-bought treats simply cannot match. You now possess the knowledge to create a moist, buttery masterpiece that serves as the centerpiece for any gathering.
Your journey from selecting quality ingredients to mastering the cinnamon swirl ensures a professional result every time. These techniques provide a solid foundation for your future baking projects in the kitchen.
Take these skills and experiment with your own variations to suit your personal taste. Share your creation with family and friends to spread the joy of a homemade dessert. Your kitchen is now ready to produce consistent, delicious results that satisfy every sweet tooth.
FAQ
What is the secret to achieving the best sock it to me cake recipe results at home?
The secret to a professional-quality result lies in using high-quality, room temperature ingredients. By ensuring your Land O’Lakes butter, large eggs, and Daisy sour cream are at room temperature, you create a smooth, emulsified batter. This technique is vital for producing the moist and buttery crumb that makes this homemade bundt cake a standout dessert.
How do I prevent my easy sock it to me cake from sticking to the pan?
To ensure your cake releases perfectly every time, you should generously grease your Nordic Ware Bundt pan with solid vegetable shortening and a light dusting of King Arthur All-Purpose Flour. Alternatively, using a specialized baking spray like Baker’s Joy can help you navigate the intricate ridges of the pan, ensuring your buttery bundt cake remains intact when inverted.
Why is the southern sock it to me cake traditionally made in a Bundt pan?
The Southern sock it to me cake utilizes a Bundt pan because the central tube allows heat to distribute evenly through the dense, rich batter. This ensures that the middle of your cinnamon pecan cake bakes at the same rate as the edges, preventing a gummy center while allowing the exterior to develop a beautiful, golden-brown crust.
What is the best way to layer the filling in a cinnamon pecan cake?
To achieve the perfect signature swirl, you should pour approximately two-thirds of your batter into the prepared pan first. Carefully sprinkle your mixture of brown sugar, fresh pecans, and McCormick cinnamon over the batter, keeping it away from the very edges of the pan. Finally, spoon the remaining batter over the top and use a knife to gently swirl the layers together before baking your homemade bundt cake.
How can I ensure my vanilla glazed cake has a professional, glossy finish?
For a flawless vanilla glazed cake topping, whisk your powdered sugar with a high-quality vanilla such as Nielsen-Massey Pure Vanilla Extract and just enough whole milk to reach a thick yet pourable consistency. You should apply the glaze while the cake is slightly warm to allow it to set smoothly over the curves of your buttery bundt cake without running off completely.
How should I store my southern sock it to me cake to maintain its freshness?
You can preserve the moisture of your easy sock it to me cake by storing it in an airtight container or under a cake dome at room temperature for up to three days. If you prefer to keep it longer, the cake can be refrigerated; however, you should allow individual slices to come back to room temperature before serving to fully enjoy the rich, buttery flavor profile.
What should I do if my homemade bundt cake turns out too dense?
A dense texture often results from overmixing the batter once the flour is added. To avoid this, you should only mix until the dry ingredients are just incorporated into the wet mixture. Additionally, ensure you are properly creaming your butter and sugar at the beginning of the process to incorporate enough air for a light, tender best sock it to me cake recipe experience.